
For more information about NDSi, visit the links below:
Google Chrome Latest Stats - Global/US/UK
For those who wants to know the latest usage stats for the latest browser from Google - Google Chrome, you can follow the link below see the stats yourself.
From what I have seen, it seems that Google Chrome is still striving at it's best to be on par with either Firefox or Internet Explorer.
Link
From what I have seen, it seems that Google Chrome is still striving at it's best to be on par with either Firefox or Internet Explorer.
Link
[Tutorial] Masking effect using Macromedia Flash
Here's a cool masking effect for applying shining glow effect on industrial robots or automobiles.
http://www.webdesign.org/web/flash/tutorials/cool-flash-masking-effect.1269.html
http://www.webdesign.org/web/flash/tutorials/cool-flash-masking-effect.1269.html
Free flash templates source
Here's a link to download nice looking flash templates source file (like flash ads, intros, etc...). It's free for certain category but it's not too bad either compared to premium templates.
http://www.flashmo.com
http://www.flashmo.com
Installing WinXP for Acer Aspire 5920G Laptop Owners
If you're one of those guy who bought themselves this laptop with Windows Vista preinstalled, yet still want to use WinXP, you can read the following guide in the link below. It didn't require you to delete your original OS, instead, the guide teach you how to dual-boot both Vista and XP.
The guide is pretty much self-explained and it includes most of the link to download the drivers for WinXP as you can't find much about those drivers for WinXP in ACER official website.
* There's something missing in that guide though, which is the part where you need to change the hard disc mode from Advanced Host Controller Interface (AHCI) to IDE mode. If you didn't change it, upon booting your laptop with XP bootdisc it won't be able to locate any suitable drives to install XP as XP cannot detect SATA drive. After installation you also need to change the windows bootloader file as XP will overwrite the bootloader file for Vista. In other words, after installing XP you won't be able to boot into Vista unless you modify the bootloader file. To do so, you can download VistaBootloaderPro.
1. Download VistaBootLoaderPro.
2. Boot into XP and install it.
3. Modify the option to allow the bootloader to be overwritten as Vista bootloader file.
4. Restart your computer.
5. Boot into Vista.
6. Install VistaBootLoaderPro again.
7. Do step 3 and allow the bootloader to overwrite the Legacy (XP) file.
8. Restart and you can now dual-boot your OS.
Since the data/file transfer rate in IDE mode is rather slow than SATA, I highly advise you to go to the BIOS again and change the hard disc mode to AHCI. However, doing so will result in the blue screen of death (BSoD) when trying to boot into XP. So before changing the mode, boot into XP, find the related hard disc drive (which is Intel ...) SATA driver and install it. Only then you are safe to change the hard disc mode.
http://www.theacerguy.com/category/aspire-5920/
The guide is pretty much self-explained and it includes most of the link to download the drivers for WinXP as you can't find much about those drivers for WinXP in ACER official website.
* There's something missing in that guide though, which is the part where you need to change the hard disc mode from Advanced Host Controller Interface (AHCI) to IDE mode. If you didn't change it, upon booting your laptop with XP bootdisc it won't be able to locate any suitable drives to install XP as XP cannot detect SATA drive. After installation you also need to change the windows bootloader file as XP will overwrite the bootloader file for Vista. In other words, after installing XP you won't be able to boot into Vista unless you modify the bootloader file. To do so, you can download VistaBootloaderPro.
1. Download VistaBootLoaderPro.
2. Boot into XP and install it.
3. Modify the option to allow the bootloader to be overwritten as Vista bootloader file.
4. Restart your computer.
5. Boot into Vista.
6. Install VistaBootLoaderPro again.
7. Do step 3 and allow the bootloader to overwrite the Legacy (XP) file.
8. Restart and you can now dual-boot your OS.
Since the data/file transfer rate in IDE mode is rather slow than SATA, I highly advise you to go to the BIOS again and change the hard disc mode to AHCI. However, doing so will result in the blue screen of death (BSoD) when trying to boot into XP. So before changing the mode, boot into XP, find the related hard disc drive (which is Intel ...) SATA driver and install it. Only then you are safe to change the hard disc mode.
http://www.theacerguy.com/category/aspire-5920/
[SOLVED] How to restore Grub bootloader after installing XP/Vista
Here's a quick guide from what I've done:
Things you'll need:
1) Ubuntu LIVE CD
Steps:
1) Boot the Ubuntu LIVE CD by restarting your computer (enter your BIOS menu and change your #1 boot priority as Cd/Dvd).
2) Insert the Ubuntu LIVE CD.
3) Choose a language and select the first option.
4) Go to terminal and type sudo -i (this command is to change the current account as root. From now on you don't need to type sudo for every command you want to use)
5) Type grub
6) Find where is your boot folder (which stored your GRUB) by typing find /boot/grub/stage1. Remember the location (it should be something like (hd0,2). I'll be using(hd0,2) as example for the steps below.
7) Type root (hd0,2)
8) Type setup (hd0)
9) Exit grub by typing quit.
10) Reboot your computer by typing reboot.
11) Eject the Ubuntu LIVE CD and the menu should be restored (only if it worked last time before the windows bootloader overwrite it)
Note:
* The first partition will always enumerated with 0. In the example (hd0, 2). The number 0 means it is the first physical hard disk and the number 2 represents the partition where GRUB is installed.
Things you'll need:
1) Ubuntu LIVE CD
Steps:
1) Boot the Ubuntu LIVE CD by restarting your computer (enter your BIOS menu and change your #1 boot priority as Cd/Dvd).
2) Insert the Ubuntu LIVE CD.
3) Choose a language and select the first option.
4) Go to terminal and type sudo -i (this command is to change the current account as root. From now on you don't need to type sudo for every command you want to use)
5) Type grub
6) Find where is your boot folder (which stored your GRUB) by typing find /boot/grub/stage1. Remember the location (it should be something like (hd0,2). I'll be using(hd0,2) as example for the steps below.
7) Type root (hd0,2)
8) Type setup (hd0)
9) Exit grub by typing quit.
10) Reboot your computer by typing reboot.
11) Eject the Ubuntu LIVE CD and the menu should be restored (only if it worked last time before the windows bootloader overwrite it)
Note:
* The first partition will always enumerated with 0. In the example (hd0, 2). The number 0 means it is the first physical hard disk and the number 2 represents the partition where GRUB is installed.
[SOLVED] foobar2k 'Unhandled exception: Bad Allocation' in Vista
Just delete all the files located under the foobar2k playlist folder (default is C:\Program Files\foobar2k\playlist)
Enable the Two Hidden Aurora's in Windows Vista

Microsoft loves Aurora's in Windows Vista. They hide an amazing boot screen that can easily be enabled. And they provide a tool for 3D benchmarks that uses aurora animation.
Windows Aurora? Enjoy!
1. 3D benchmarks a. In the start menu search box, type "winsat aurora"
2. Hidden Aurora Boot Screen

a. Type msconfig into the start menu search box, and press enter.
b. Go to the Boot Tab and check the "No GUI boot" checkbox option.
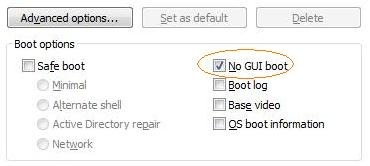
Choose OK and reboot your computer. Now, you will see the Aurora boot screen while starting.
UnlockThis! CPU-Z, a useful System Profiler tool
CPU-Z is a portable freeware system profiler for Microsoft Windows that gathers information about the central processing unit (CPU), RAM, motherboard, and other hardware features.
"Before I upgrade my laptop memory, I used this portable application to see and verify the memory type and frequency. "
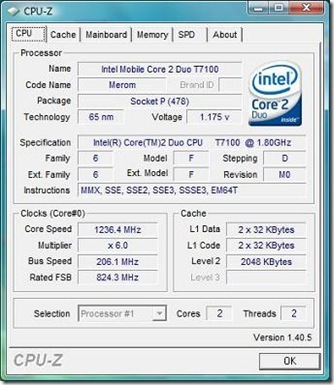
CPU-Z is needed to identify certain hardware components without opening the PC or laptop, especially the memory type and frequency, mainboard vendor, core revision and RAM clock rate. The ability to get clock speed makes it an important tool for motherboard overclockers.
Hardware Information List:
(SOURCE: http://www.cpuid.com/cpuz.php)
CPU - Name and number, Core stepping and process, Package, Core voltage, Internal and external clocks, clock multiplier, Supported instructions sets and Cache information.
Mainboard - Vendor, model and revision, BIOS model and date, Chipset (northbridge and southbridge) and sensor, Graphic interface. Memory - Frequency and timings, Module(s) specification using SPD (Serial Presence Detect) : vendor, serial number, timings table.
System - Windows and DirectX version.

 Posts
Posts


